The information contained on this page uses the Canon ZR series MiniDV camcorder to illustrate the main components and operating controls for a typical MiniDV camcorder. The controls may differ slightly from manufacturer to manufacturer, but an understanding of one model usually allows the operator to move quickly to a new model without a lot of extra training.
MiniDV camcorders are tape-based camcorders. The majority of camcorder manufacturers are moving to solid state or hybrid camcorders, however most of the camcorder controls are still similar on the newer models as well.
Use the images below as a reference to complete your review sheet. Label each component and answer the questions to complete the sheet.
Identifying Camcorder Operating Controls
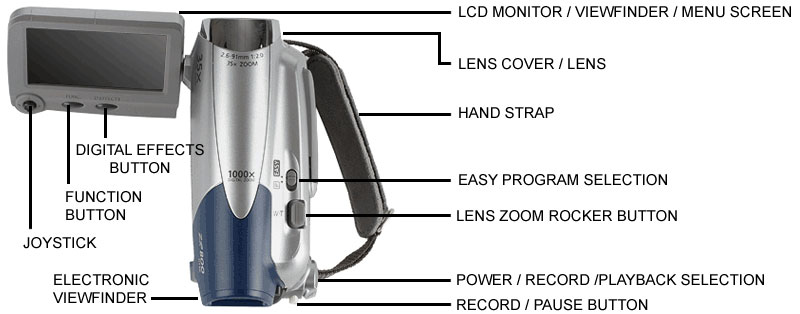
The information below identifies the function of each control identified in the first image above:
LCD Monitor - Used to view and focus for recording video. Also used to view video on playback.
Lens Cover - Protects the lens when the recording function is not being used.
Hand Strap - Used to hold and steady the camcorder.
Digital Effects Button - Accesses digital special effects for recording video
Function Button - Opens the "Function" menu.
Joystick - Allows access to and selection of menu options. This control would not be present on "touch screen" camcorders.
Easy Program Selection - Enables automatic settings and operation for ease of recording.
Lens Zoom Rocker Button - Enables optical and digital zoom functions of the lens.
Power / Record / Playback Selector - Enables selection of the main recording and playback functions.
Record / Playback Button - Starts and pauses the recording function.
Electronic Viewfinder - Allows viewing of subject without opening the LCD screen

The information below identifies the function of each control identified in the image above, not yet identified from the first image:
Viewfinder Focus Slider - Adjusts the focus in the electronic viewfinder but NOT the actual camcorder focus.
Battery Lock and Release Button - Locks the battery in place or unlocks it for removal.
Firewire / Audio / Video Connection Cover - Cover to protect the audio and video connectors.
Battery - Powers the camcorder when AC power is unavailable.
Power / Record / Playback Lock Button - Locks camcorder in play or record to avoid accidental movement.
LCD Monitor Open Tab - Used to open the LCD monitor Screen when not using the electronic viewfinder.
AC Adapter / Battery Charger Input - Connector for the AC Adapter / Battery Charger.
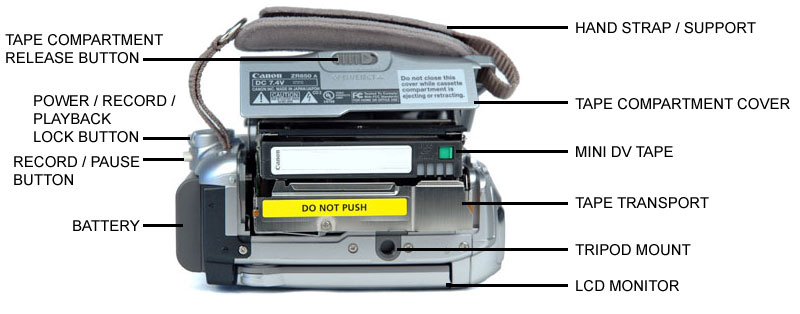
The information below identifies the function of each control identified in the image above, not yet identified from the first or second image:
Tape Compartment Release Button - Opens the tape compartment cover, allowing the tape transport to open.
Tape Compartment Cover - Protects the tape and tape transport components.
MiniDV Tape Cassette - Recordable media to record, playback and store MiniDV data files.
Tape Compartment Release Button - Opens the tape compartment, allowing the tape transport to open.
Tripod Mount - Threaded insert that allows the camcorder to be mounted on a tripod to steady the camcorder.
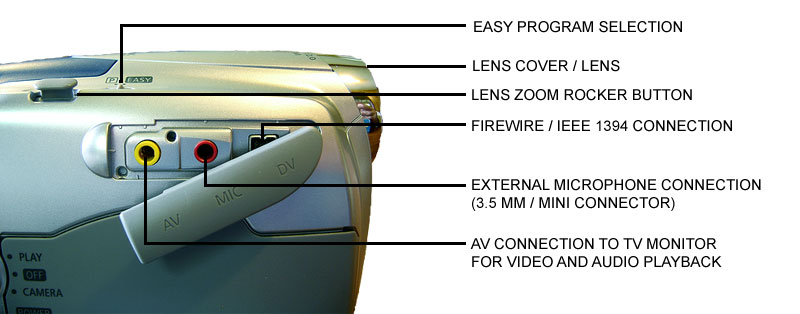
The information below identifies the function of each control identified in the image above, not yet identified from the first, second or third image:
Firewire / IEEE 1394 Connector - Allows for the transfer of recorded video to a computer.
External Microphone Connector - Allows for the use of an external microphone for better audio recording.
A/V Connector - Allows the camcorder to display images on an external TV or Monitor for playback or editing.
Automatic / Manual Focus
Most new camcorders rely on sensors to automatically focus the camcorder. Although this can sometimes lead to improper focus, this is a desirable feature. For the most part, this feature is indispensible to the beginning videographer. Manual focus controls will vary from model to model and also from manufacturer to manufacturer.
Manual focus is actually considered an "upgrade" or a "pro" feature. Manual focus should only be used after becoming very familiar with your camcorder and much practice. It is accessed on most camcorders by either a ring around the lens, a separate focus "knob" or wheel, or finally on a menu or touch screen on the camcorder's LCD monitor.
Exposure
Once again, camcorder exposure is best left to the automatic controls on your camcorder. Many new camcorders use "programs" that can be selected for different lighting situations. These pre-programmed settings are probably best for the beginning videographer as well. Selections can be made from the menu or touch screen just like focusing.
White Balance
Different types of light will affect your camcorder's imager differently. This results in an evident color shift in your recorded images. This is primarily seen in the areas that should appear white in your videos. Daylight (sunlight) is the optimal color of light for recording video images. However, sometimes we must record in rooms with incandescent or flourescent light. This is how the "white balance" control comes into play.
Flourescent light will give a blue-green tint to all of your recorded video images if left unchanged. The "white balance" control is, in effect, a filter. This control applies a filter that color shifts the color in the white images to make it appear as if you were recording in daylight. It will do the same to adjust for incandescent light. Incandescent light can make your images appear yellow or orange. Your use of the automatic setting for white balance will make these corrections for you to ensure that your images are always color balanced.
Video professionals believe that a true white balance setting should be taken manually. This is done by holding a white card up and using the manual settings on your camcorder. Once again, it is probably best for beginning camcorder users to allow the auto settings on your camcorder to control your white balance.
Camcorder controls will continue to evolve and change in the future. It is impossible to cover all of the information on a short web page. The best way to become familiar with the controls is to carefully read the owner's manual and to practice recording with your camcorder. Only after some reading and practice, will you be ready to go out and record video that will look focused, properly exposed and color balanced. Capturing that video is the first and probably the most important aspect of video production. Without good video, it will be impossible to edit together a professional video production.
|