In order to produce any type of video, there must be some preliminary planning. If you are basically a production person, someone else may do the planning, and you will interpret their instructions. Regardless, someone will have to do this preliminary work.
There are two basic stages to the planning process. The stages are outlined and explained below. Try to become familiar with this information, since it will be important to you in the future and you will be expected to know the material when tested on it.
SCRIPTING
A script is usually the first step in a video production. A script is basically a story. However, there are very specific rules that should be followed in putting a script together. There is also a lot of terminology related to film, lighting, camera angles, camera movements, etc. that must be learned.
There are writers who develop scripts for video and film productions. These people are not exactly authors, but "screenwriters". They will produce two types of scripts. The first type of script is called a "spec script". The "spec script" is written and sent out to producers and actors to get them interested in doing or producing a film or video. The "spec script" is not one that the average videographer needs to be involved with. It is one that tells a story for a large scale video production or film. They must be written following a very strict format, otherwise they will never be read.
The average videographer will be dealing with much smaller productions that may involve industrial training, commercials and music videos. The type of script required for that type of small production is called a "shooting script". "Shooting scripts" may contain very little dialogue. The "shooting script" would carry camera directions, sound, "transitions" and camera movements.
There is not enough time for us to get involved with developing scripts. If you are interested in developing stories for film and video, you may want to research schools for additional training in creative writing, technical writing and screen writing.
STORYBOARDING
"Storyboarding" is the process of producing sketches of the sequence for a video or film production. It is very similar to the production of a comic book. Actually, many advertising agencies will forego the step of producing a script for a short production or commercial. If the action is very compact, and relies more heavily on visual effects rather than spoken dialogue, the storyboard allows for the inclusion of dialogue and sound, but it is presented along with pictures.
"Storyboarding" allows you to visualize how the completed shots are going to look. It communicates to the camera crew how to move cameras and lights and the actors can get a better feeling for what is going to be shot. You do NOT have to be a great artist to produce a storyboard. The storyboard is similar to "thumbnail sketches" for a layout. It is more important to just portray the basic layout of the shot and the positioning of props and characters than to create beautiful illustrations. Both Hitchcock and Spielberg did poor sketches, but their films are masterpieces.
There are professional storyboard artists that can create images that are sometimes better than the final film. It may be necessary to use someone with those skills when elaborate special effects or complex visual sequences are planned. However, for the most part, you should be able to produce most storyboarding on your own.
STORYBOARDING FORMATS AND SCRIPT DIRECTIONS
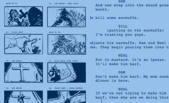
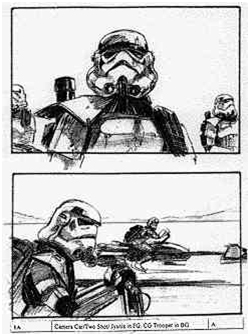
This example shows illustrations from a storyboard created by a professional artist. Your illustrations do not have to be as dynamic. You should be creating your storyboards to look a bit more like the one seen in the example below. Note the use of arrows to indicate camera movement and movements within the scene.
The description below the illustrations are a critical part of the storyboard process.
Dialogue, voiceovers, narration and music soundtracks should be included in the descriptions.
Before attempting to create your storyboard, review the guidelines listed below.
|
|

STORYBOARDING GUIDELINES
Here are some guidelines for producing storyboards:
Keep the area you have to draw small. It allows you to draw much faster. The pictures become more like doodles than works of art.
Use a standard storyboard sheet. There are three basic storyboard types: "Widescreen" (16:9 Ratio) -15 frames, "Standard ratio" (4:3 Ratio) - 20 frames, and "Standard ratio with space for overhead plan" - 8 frames.
Sketch in pencil. You will be able to make changes easily and you will still be able to ink over the pencil later for photocopying.
Describe the shot or scene sequence. It is important to indicate what is to be happening.
Numbering the shots may be helpful. This information can be used to set up shooting, locations, and also used later when editing.
Camera Directions
When you develop the storyboard, there are several abbreviations used to designate the position of the camera and the composition of the scene. These should be included in the screen description and dialogue on the lines below the sketch boxes. They are listed below:
C/U - Close-up
MS - Medium Shot
LS - Long Shot
Two-Shot - Shot of two characters in the same picture
V.O. - voiceover
O.S. - off screen
P.O.V. - Point of view (for example: one of those wobbly cameras they use when someone is breaking into an apartment in a horror movie. )
M.O.S. - without sound. Apparently comes from "Mit out sound" which some German directors used.
Camera Movements
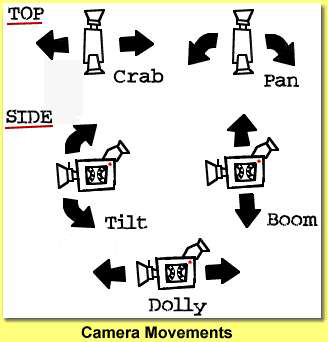 |
CRAB - camera moves completely to the left/right
PAN - camera pivots left or right
TILT - camera pivots up or down
BOOM - camera moves up or down
DOLLY - camera moves in/out from subject
ZOOM - camera zooms in/out from subject (not strictly a camera movement because it's the lens that's moving, not the camera)
|
Transitions
These are how you change from one scene to another. These may be indicated on your storyboard description.
CUT TO : which is a straight change of picture from one scene to the next.
There are some other transitions available, but be careful, they have different connotations to the viewer.
DISSOLVE TO :
The final shot of the previous scenes fades into the first shot of the next scene. This can be used to suggest the passing of time.
FADE IN :
Usually used at the start of films, with FADE OUT used to end the movie. You can also use CUT TO BLACK and CUT FROM BLACK/CUT IN. You can use these transitions together to alter the mood and pace.
Drawing storyboards is an excellent way to keep motivated, to show you're organized and to let everyone know what you are visualizing in your head. Storyboards are NOT written in stone! If you begin shooting and get a new idea or see a better camera angle...go ahead. Use it! Get the shots you need, but don't be afraid to get a little more. You can always rearrange things at the editing stage!
s Page

|